Showing posts with label Cookies. Show all posts

Thursday, December 19, 2013

Live & Learn Thursday: Grandma's Cut Out Cookies

Life As Always
 
I have just been full of recipes lately.  The lovely ladies who host this blog are going to expect this all the time....
 
I can't make any promises.  I've just been baking because it's the holidays.
 
Today, I'm going to share with you a recipe that's been in my family for as long as I can remember.  My mom's sister was moving last summer, and in order to reduce her belongings, she bestowed on me the cookie cutters we use to make my Grandma's cut out cookies.  We've made them since I was little.  My brother, mom, and I would go over to my aunt's and bake cookies all day.  (I was SO excited when I was old enough to make the chocolate chip cookies all by myself!) 
 
Last year, we made them together at my mom's house, but this year, time is just not on our side.  My brother basically said it wasn't Christmas if no one made these cookies.  So I did.  It's the first time I've ever made them by myself, and I have to say, they turned out pretty well!
 
Here's how:
 
Grandma's Cut Out Cookies
Cookie Ingredients
  • 1 c. butter, softened (2 sticks)
  • 2 tsp. vanilla
  • 1 c. white sugar
  • 1 c. brown sugar
  • 3 cups flour
  • 1/2 tsp. salt
  • 1 tsp. baking powder (PLEASE NOTE: baking powder, NOT baking soda)
  • 4 eggs
Frosting Ingredients
  • 4 cups confectioners sugar
  • 1/2 c. (1 stick) butter or shortening*
  • 5 T milk
  • 1 tsp. vanilla
  • Food coloring (optional)
*I used butter.
 
The cookies:
 
1. Preheat oven to 350 degrees F.
 
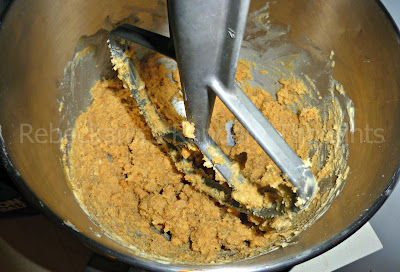
2. Cream butter and sugars.
 
Before
After
2. Add vanilla and beat in eggs.
 
Before
After
3. Add salt, baking powder, and flour.
 
Before
 
After
4.  Turn out the dough onto a floured surface.  (The dough WILL be sticky, but I promise, it won't stay that way!)
 
 
5. Knead it a bit in the flour until it is no longer sticky.  Then roll it out and begin using your desired cookie cutter!
 
I started with angels. :)
It is horrifying how awful my oven looks....
 
6. Bake at 350 degrees for 10 minutes.  Here are my different variations:
Please forgive me now for the horrible condition of my cookie sheets....
Christmas trees

Santa

Stars
And I also made bells (see picture of completed cookies).  I must have been getting tired at this point. 
 
A few things I learned before I tell you about the frosting.
~Some of my cookies are a little thinner (therefore crispier) than others.  I clearly rolled the dough a little too thin for some cookies, and absolutely perfect for others. 
~If your cookies are thin like my stars and Santas are, you may want to knock a couple of minutes off of the cooking time.  (Try 8 minutes.)
~Putting flour on my counter stresses me out.  It was messy....fun....but a little insane.
~I need to buy new cookie sheets if I'm going to take pictures of food on them....
 
The Icing:
 
1. Cream sugar and butter (or shortening) until smooth.
 
I swear there's butter underneath all of that powdered sugar!  (See down in the bottom left of the bowl!)
2. Gradually mix in milk and vanilla with an electric mixer until smooth and stiff (about 5 minutes).
 
During
After
 
3.  Spoon out desired amounts into bowls and add food coloring if desired.  Mix with a spoon, and spread on each cookie with a butter knife. 
 
This is just my share of the cookies.  The other half went to my parents and brother. :)
Things I learned about the frosting.
1.  This may be a tad thinner than it should be.  But I literally used the rest of the bag of powdered sugar I had, and I couldn't have done anything about it if I wanted to.  SO have plenty on hand.
2. I also somehow had A LOT more frosting than we had last year.  I followed the same recipe, but we had to keep making more.  I ended up throwing a lot away.  It bothers me just to talk about it.  I don't like being wasteful, but once this stuff hardens up, I'm not sure you can really use it again anyway.
3.  It takes a lot of red food coloring to make Santa red and not pink.  That red was at least 25 drops. 
 
I know this post was long!  Thanks for sticking with me!  I hope you give these cut outs a try!  I'd love to hear about it if you do!
 
MERRY CHRISTMAS! :)
 

Tuesday, December 17, 2013

Peanut Butter Blossoms

One of my favorite things about Christmas is making Christmas cookies!!  Of course, these cookies can be made any time of the year, but they're just more special when you're making them on a snowy day with Christmas just around the corner!  :)

For those of you who are new around here, please remember, that I'm not creative enough to make recipes of my own!  When I post a recipe, it's just something I've tried in my kitchen.  I note changes I made or things that did/didn't work for me.  I find that it's always nice to hear from someone else any problems that were encountered or adjustments to make things easier.  I also am sure to make sure you know where I found the original recipe.

I found this recipe on a coupon for Crisco products last year.  I didn't need the coupon, but I did need want the recipe! 

Peanut Butter Blossoms
Ingredients


Baking soda not pictured because I am a dummy.  :)

  • 1/2 c. Crisco Butter Flavor All-Vegetable Shortening
  • 1/2 c. Jif Creamy Peanut Butter*
  • 1/2 c. firmly packed brown sugar
  • 1/2 c. granulated sugar
  • 1 large egg
  • 2 T milk
  • 1 tsp. vanilla extract
  • 1 3/4 cups Pillsbury BEST All Purpose Flour**
  • 1 tsp. baking soda
  • 1/2 tsp. salt
  • sugar
  • Hershey's Kisses
*I ALWAYS buy and use Jif Peanut Butter, but I never buy or use creamy.  I LOVE, LOVE, LOVE extra crunchy.  Which, by the way, is the only other option.  There's just creamy and extra crunchy.  I don't know why, but I'm ok with that.
**I use whatever store brand generic all-purpose flour I have in my cabinet.  :)
 1.  Preheat oven to 350 degrees.  (The original recipe calls for 375 degrees.  I bake almost everything at 350.) Cream together shortening, peanut butter, brown sugar, and 1/2 c. of sugar.

Before
After
 2. Add egg, milk, and vanilla.  Beat well.
 
 
3. Stir together flour, baking soda, and salt.
 
Before
After
4. Add to creamed mixture.  (Tossing it all over your mixer and counter while adding it to the bowl is totally optional.) 
 
Don't know if you can tell or not, but this is an action shot! :) haha
5.  Beat on low speed until stiff dough forms.
 
 
6.Shape into 1-inch balls.  (I totally don't know what size that would actually be.  Just shape it into a dough ball, and go with it!)
 
 7. Roll in sugar.
 
8. Place 2 inches apart on ungreased cookie sheet.
 
 
 9. Bake at 350 degrees for 12 minutes or until golden brown.  (If you go with 375 degrees, you may want to adjust the time to 10 minutes.)
 
I apologize for my lousy baking sheets.  This was my good one.  I only used it for baking cookies.  Then someone's husband made regular food on it....and well, THIS happened.  :-p
10.  Immediately, top each cookie with a Hershey's Kiss.  Be sure to press down firmly to settle the Kiss into the cookie.
 
 
11. Remove from sheets to cool.
 
The recipe says it yields 4 dozen (48) cookies.  I got just over 2 dozen (28 cookies).  I'm guessing my "1 inch" dough balls were too big, but honestly, it's not like they taste any different.  So if you want to get more cookies out of this recipe, just make the dough balls smaller.
 
Enjoy!

Friday, December 13, 2013

Five for Friday!

1. I just finished teaching my only class for the day.  Students are being rewarded for earning their AR (Accelerated Reader) points, and so they're on computers, tablets, DS's and other electronics today.

I figured if they can do it, I can do it, too! ;)

2. I am still not ready for Christmas.  I have some gifts, but still have quite a few to get.  I always think I have so much time, and then...BOOM.  12 Days 'til Christmas.  How does that happen?

via
3. I had to cut back on Christmas gifts this year.  People seriously need to stop having babies! ;)  lol  I used to by something for my friends' kids, but it's just not possible any more!  There are so many, and then I feel bad for not buying gifts for Scott's friends' kids or kids of our mutual friends.  It's just not worth the guilt. 

Unfortunately, I just don't get to see many of them anyway.  I doubt they'll even notice that they're missing something from me.

4. I'm planning to make some Christmas cookies this weekend.  Here's what's on my list:
  • Chocolate chip (my "specialty")
  • Cut out cookies (a family recipe)
  • Peanut Butter Blossoms (recipe coming to the blog on Tuesday!)
  • No Bakes
  • Citrus Sugar Cookies (These are a box mix from Tastefully Simple.)
That should probably be enough! :)

5. I decorated my Christmas tree last night.  I put the lights on on Sunday.  I've come to the conclusion that I need to buy my own ornaments.  I have all of the ornaments I made in school and a random assortment of ones purchased for me growing up.  Some of them I love, but I really hate my tree.  lol

I think I should've left the ornaments off.  I liked it better with out them:


Saturday, February 9, 2013

Peanut Butter Kiss Cookies

If you have only known me for about one minute, you will probably know that there are few things that I love more than combining peanut butter and chocolate. Whoever first decided to combine peanut butter and chocolate is, in my book, a total genius. Yesterday, I was feeling in the mood to make some cookies. Around Christmas time, I wanted to make peanut butter cookies and never did. I also wanted to make something with ingredients that we had on hand.  Scott was not 100% on board with peanut butter and suggested chocolate chip. We didn't HAVE any chocolate chips, and he said, "Just chop up some Hershey's Kisses."

I wasn't totally on board with that either. (READ: Don't get me wrong, chocolate chip cookies are in my Top 5 Most Favorite Cookies List....not that I actually have a list....It's a mental list....). So, in the spirit of good marriage, I compromised, and Peanut Butter-Kiss Cookies were born. I used my trusty Kitchen Aid mixer and the Peanut Butter Cookie recipe from my also trusty Betty Crocker Cookbook. I also made some additions from the Peanut Butter Cookie recipe in the Kitchen Aid Mixer cookbook. The directions are a combination of the recipes, as well.

Becky's Peanut-Butter Kiss Cookies

Ingredients
  • 1/2 cup granulated sugar
  • 1/2 cup packed brown sugar
  • 1/2 cup peanut butter (Neither recipe specifies creamy or crunchy. I only buy crunchy, so that's what I used. :))
  • 1/4 cup shortening
  • 1/4 cup butter or margarine, softened
  • 1 large egg
  • 1/2 teaspoon vanilla
  • 1 1/4 cups all purpose flour
  • 3/4 teaspoon baking soda
  • 1/2 teaspoon baking powder
  • 1/4 teaspoon salt
  • 25 Hershey's Kisses, chopped
1. Preheat oven to 375*.

2. Place peanut butter, butter, and shortening in the mixer bowl. Use the flat beater to mix on Speed 6 until mixture is smooth.
     
    3. Scrape the bowl then add the egg, vanilla, and sugars. Beat on speed 4 until mixed.
     
    4. Using the stir setting, add flour, baking soda, baking powder, and salt.
     
    5. If you have chocolate chips, feel free to use those. I would say to use about 1/2 of what you would use for chocolate chip cookies. I do think that these cookies would be better with the semi-sweet taste of a chocolate chip as opposed to the Kiss. If you're using kisses like me, unwrap the kisses and toss them in a food chopper or processor.


    6. Add the chopped up Kissed to your dough, and stir.

     
7. Roll dough into 1 1/4-inch balls. (Let's get real here. I have NO idea what that size looks like, and I definitely didn't grab Scott's tape measure to try to figure it out. Just don't make huge rolls of dough because even the smaller ones I made expanded and touched each other. Which is PROBABLY why the directions say to place them 2-3 inches apart. Again, to do this, one would have to use way more cookie sheets, and I prefer to get 1 dozen on each sheet. Also, the picture is of the last sheet I put in. I realized I had forgotten to take a picture of this step, and that is why there isn't a dozen on it!)

    8. Use a fork to push down the dough in a crisscross pattern.
 

    9. Put the cookies into the oven and bake for 9-10 minutes. (My cookies were done in 9 minutes.)

    Cool however you usually do. I asked for and received a set of cooling racks for my bridal shower last year. I LOVE them. Of course, with the size of these cookies, I had to eat one from each of the first 2 dozen to make them fit.....hahaha :) Enjoy!
     
post signature
 
Content Rebeckann's Random Thoughts | Design Poppiness Designs