Showing posts with label cooking. Show all posts

Monday, March 7, 2016

Influester VoxBox: Filippo Berio Olive Oil

There are few things I love more than getting free stuff!

So as always, I was thrilled to be chosen for another Influenster VoxBox program.  This time, I was sent a mailer containing a coupon for a FREE 16 oz. bottle of Filippo Berio Extra Virgin Olive Oil or a Robusto flavor.


The mailer also included $2 off coupons for these two olive oil options, a butter to olive oil conversion chart magnet, a booklet with 101 ways to use olive oil, and a guide for hosting a tasting party.

Scott and I already use olive oil for all of our cooking/baking/frying needs.  We currently buy a large container of the Daily Chef brand when we shop at Sam's Club.  I was certainly willing to give another brand a try.


The first night I used this oil, I was making Quinoa Chili.  I used a tablespoon to saute some onions and garlic for the chili.

The bottle has a nice pour spout, I thought.  I didn't feel like I would accidentally dump it all over the place!  
When Scott and I make any kind of pasta, we always drizzle some olive oil over into the pot after dumping the pasta into the strainer.  Then we drizzle some more over the pasta and toss it to help it not to stick together.  I also gave this a try with Filippo Berio's Extra Virgin Olive Oil.

On Sunday, I made Kristin's Easy Pizza Dough Recipe, and this was the oil I used.  


I also used it to make some Banana Chocolate Chip Muffins for breakfast this week.  So far, everything has tasted great.

I can honestly say that I don't have any really knowledgeable, deep insight to share about this olive oil.  It doesn't really stand out, but it also doesn't seem to be different than the regular olive oil I use.  Both the regular Daily Chef Olive Oil and the Filippo Berio Extra Virgin Olive Oil have the same nutritional facts, as well.  (I was always under the impression that EVOO was supposed to be healthier...?)  I also found that this brand is pretty expensive compared to the brand we usually purchase.  It was on sale when I bought mine, and it was still over $6 for a 16 oz. bottle.  If I didn't have a FREE coupon, I wouldn't have purchased it.  I may choose to use some of my $2 off coupons, but I will probably not buy it after that.

Have you ever used this brand of Olive Oil before?


I received this product free from Influenster and Filippo Berio.  All opinions are my own.

Thursday, July 9, 2015

Stuff & Things 7/9


Kristin's Knook

  • Clearly, I have not been around here much lately.  With an uneventful summer taking place, it has occurred to me that blogging is just no longer one of my priorities.  But every now and then, I feel like sharing something.  So I'll pop up from time to time....especially to share the books I'm reading. #booknerd
  • I have decided that I hate cooking.  This is kind of sad because I really like food.  The problem is that in order to eat food, I have to cook it.  I find this to be an interesting turn of events because I used to like sharing my experiences with cooking here in this space.  You can still see the recipes I've tried in my ABC order Recipe Index or the Category Index.  

  • It will  not quit raining here in Pennsylvania.  I think I should build an ark.... 

  • I have decided that I will be teaching a reading unit on Harry Potter and the Sorcerer's Stone this year.  I know so many kids love it, and even if they've read it/heard it/seen the movie before, studying it will be different and fun!  One of the things I plan to do is have a Class Cup competition during the unit!  Students will earn points for getting 100% on tests and quizzes, turning in assignments on time, being prepared for class, etc.  

What kinds of stuff and things are happening with you lately?

Friday, October 10, 2014

Potter Fix Friday: HP Recipes

Potter Fix Friday
I'm excited to be linking up with Ashley and Page for Potter Fix Friday again this week!  I totally missed last month's link-up.

This month's topic is Harry Potter Recipes.  

I can't say that I've ever actually made any Harry Potter recipes.  

I originally found this as a Pinterest pin, and I do still have it pinned to my "I Love Food" board, but since Pinterest has made it impossible to embed pins, and I'm writing this at work, we'll just do it the old fashioned way.  Luckily, the pin actually leads to a website.

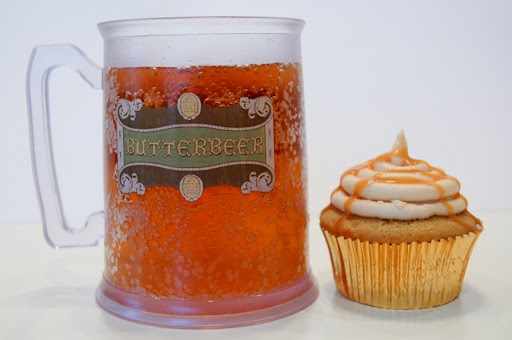
Butter Beer Cupcakes

via
I have the first two Harry Potter books available for my students to read and study in reading class.  I think that if any of my classes ever choose to read one, I am TOTALLY making them these cupcakes.

Other than making homemade butter beer itself, this is really the only Harry Potter-like recipe that I'm thinking I really want to try some day!

Have YOU ever made a Harry Potter recipe?  What would be on your list of things to make?

Friday, August 15, 2014

Taco Braid

Have I ever mentioned how much I love delicious, easy recipes???

I do.

And this is one.

Taco Braid
Ingredients

  • Lean ground beef (80/20)*
  • 2 cans crescent rolls
  • Mexican blend cheese
  • taco seasoning
*You can use as little as 1 lb and probably as much as you want.  I used about 1.5 lbs.

1. Brown ground beef and drain.  Then add taco seasoning as you would when making tacos.


2.  While taco meat simmers, lay out your crescent rolls, (large ends are placed on the inside) and press together.


3. Fill in the center with the taco meat.


4. Sprinkle with the cheese.  (Another great thing about this recipe...how much you use is TOTALLY up to you.  The original recipe doesn't even put cheese on the inside.  I thought that was nonsense.)


5. Fold in the ends, and bake at 350* for 20 minutes or until golden brown.  Then sprinkle more cheese on top, and bake until melted.


I think I was too excited about eating this to take a picture once it was baked and the cheese was melted.  Plus, someone was home from work and wanted to eat so....

I made a packet of the Knorr Spanish Rice sides with this, and it was great!  You can also serve with taco toppings: salsa, sour cream, taco sauce, lettuce, etc.  Scott put salsa, taco sauce, and the rice all on top of this, and he loved it!  I tried it as is, and I loved it that way, too!  Make it your own! :)  You can have it as an appetizer, a side, or a main dish.  It's great for pot lucks, too!  You could cut slices and then cut them in half by going straight down the middle!

I made this taco braid on the tray from my Celebrating Home hospitality set in the Simply Summer stoneware pattern.  This used to be a piece that only hostesses could get after two friends booked parties.  In our Fall/Winter 2014 catalog, we have them available in two stoneware patterns: Berry and Sonoma Villa.

3-Piece Berry Hospitality set (bowl, tray, stand)

3-Piece Sonoma Villa Hospitality Set (bowl, tray, stand)


Wednesday, August 13, 2014

Fiesta Soup

Recently, I shared a recipe for Chocolate Peanut Butter Protein Bars.  While I was searching for recipes, I came across this soup recipe that sounded absolutely amazing.  I was able to give it a try, and it definitely lived up to my expectations!

Best of all, it's super easy!

It's not the prettiest picture, but I promise, the soup is fabulous!
Fiesta Soup
Ingredients

  • 1/2 c. diced onion
  • 2 cloves garlic, minced
  • 1 can of black beans (15 oz) drained and rinsed
  • 1 can of kidney beans (15 oz) drained and rinsed
  • 1 can diced green chili peppers (4.5 oz)*
  • 1 can diced tomatoes (14.5 oz)*
  • 2 1/2 c. low sodium, fat free chicken broth
  • 1 c. frozen corn
  • Juice from 1 lime
  • 1 T. chili powder
  • 1 tsp. cumin
  • 1/2 tsp. cayenne pepper
  • 1/2 tsp. black pepper
  • sea salt (to taste)
  • 2 boneless, skinless chicken breasts, cut into 1-2 in. cubes
*Do not drain

Take all of that stuff up there, chop it, open it, drain it, rinse it, measure it, and throw it all in your slow cooker.

Cook on low 6-8 hours.  (I ended up cooking mine for 7.)

1 cup serving: 91 calories, 7.5 g protein
2 cup serving: 181 calories, 15 g protein

The end.

What I like about this recipe:
There are a lot of ingredients, but that doesn't bother me at all since it all gets tossed in the slow cooker, and I don't have to worry about it until it's time to eat.  I will note that I did go out to stir it occasionally, but that was only because I was home, and I felt like it.

It's a slow cooker recipe.  Duh.

The flavor is amazing.  It's kind of similar to chili.

I DIDN'T HAVE TO COOK THE CHICKEN!!  I've mentioned recently that I just seem to have trouble with chicken recipes.  The pieces of chicken are small, and are being cooked for at least 6 hours, so they are cooked in all of that chicken broth and yummy goodness.  The chicken pieces were moist and flavorful, and I didn't feel compelled to pick them out and eat them first to get it out of the way!

What I don't like about this recipe:
The original recipe calls for cilantro.  While I know how much my friend, Kristin, loves cilantro, I'm not a fan.  So I just didn't use it.   

You can find the original recipe here.

Tuesday, December 17, 2013

Peanut Butter Blossoms

One of my favorite things about Christmas is making Christmas cookies!!  Of course, these cookies can be made any time of the year, but they're just more special when you're making them on a snowy day with Christmas just around the corner!  :)

For those of you who are new around here, please remember, that I'm not creative enough to make recipes of my own!  When I post a recipe, it's just something I've tried in my kitchen.  I note changes I made or things that did/didn't work for me.  I find that it's always nice to hear from someone else any problems that were encountered or adjustments to make things easier.  I also am sure to make sure you know where I found the original recipe.

I found this recipe on a coupon for Crisco products last year.  I didn't need the coupon, but I did need want the recipe! 

Peanut Butter Blossoms
Ingredients


Baking soda not pictured because I am a dummy.  :)

  • 1/2 c. Crisco Butter Flavor All-Vegetable Shortening
  • 1/2 c. Jif Creamy Peanut Butter*
  • 1/2 c. firmly packed brown sugar
  • 1/2 c. granulated sugar
  • 1 large egg
  • 2 T milk
  • 1 tsp. vanilla extract
  • 1 3/4 cups Pillsbury BEST All Purpose Flour**
  • 1 tsp. baking soda
  • 1/2 tsp. salt
  • sugar
  • Hershey's Kisses
*I ALWAYS buy and use Jif Peanut Butter, but I never buy or use creamy.  I LOVE, LOVE, LOVE extra crunchy.  Which, by the way, is the only other option.  There's just creamy and extra crunchy.  I don't know why, but I'm ok with that.
**I use whatever store brand generic all-purpose flour I have in my cabinet.  :)

 1.  Preheat oven to 350 degrees.  (The original recipe calls for 375 degrees.  I bake almost everything at 350.) Cream together shortening, peanut butter, brown sugar, and 1/2 c. of sugar.

Before
After
 2. Add egg, milk, and vanilla.  Beat well.
 
 
3. Stir together flour, baking soda, and salt.
 
Before
After
4. Add to creamed mixture.  (Tossing it all over your mixer and counter while adding it to the bowl is totally optional.) 
 
Don't know if you can tell or not, but this is an action shot! :) haha
5.  Beat on low speed until stiff dough forms.
 
 
6.Shape into 1-inch balls.  (I totally don't know what size that would actually be.  Just shape it into a dough ball, and go with it!)
 
 7. Roll in sugar.
 
8. Place 2 inches apart on ungreased cookie sheet.
 
 
 9. Bake at 350 degrees for 12 minutes or until golden brown.  (If you go with 375 degrees, you may want to adjust the time to 10 minutes.)
 
I apologize for my lousy baking sheets.  This was my good one.  I only used it for baking cookies.  Then someone's husband made regular food on it....and well, THIS happened.  :-p
10.  Immediately, top each cookie with a Hershey's Kiss.  Be sure to press down firmly to settle the Kiss into the cookie.
 
 
11. Remove from sheets to cool.
 
The recipe says it yields 4 dozen (48) cookies.  I got just over 2 dozen (28 cookies).  I'm guessing my "1 inch" dough balls were too big, but honestly, it's not like they taste any different.  So if you want to get more cookies out of this recipe, just make the dough balls smaller.
 
Enjoy!

Friday, June 21, 2013

Lasagna!

I don't think words can truly convey how much I LOVE lasagna.  It is one of my favorite meals.  Though it is a bit time consuming to make, it is quite simple.  The fact that it takes some time is probably good, or I'd end up eating it WAY too often.

This recipe is not ingenious or of my own creation.  It's right from the back of the box of the Barilla lasagna noodles I buy.  I decided to share it for two reasons: 1) I thought you'd like to know how I make lasagna.  2) Barilla changed the recipe on the back of their box, and I like this one! (Sorry the photos are a little blurry.  I didn't realize until after the lasagna was long gone....


Lasagna (From Barilla box with my adaptations)

Ingredients
  • 1 Box Barilla Lasagne No-Boil noodles
  • 2 eggs
  • 15 oz. ricotta cheese
  • 4 c. shredded mozzarella cheese (divided)
  • 1/2 c. grated Parmesan cheese
  • 1 lb. ground beef
  • 2 jars spaghetti sauce (I use Francesco Rinaldi Three Cheese sauce.)
  • salt. pepper, garlic powder (to taste)
1. Brown ground beef and drain.
2. Season ground beef with salt, pepper, and garlic powder.
3. Preheat oven to 375*, and spray a 9 x 13 casserole dish with cooking spray.  (FYI: My casserole dish is only 2 inches deep.  The directions for this lasagna will be for this dish.)
4.  In a medium bowl, beat eggs.
5. Stir in ricotta, 2 c. of mozzarella, and the Parmesan.
6. Stir ground beef into cheese mixture.  (This will save you a layering step.)
7. Spoon half a jar of sauce onto the bottom of your casserole dish.
8.  Layer with 3 sheets of lasagna noodles.  (This was from the new box.  I used to use 4, but the three sheets expanded nicely, so you can leave space between each sheet.)
9. Spread half of the cheese/beef mixture onto the noodles.
10. Add the remaining sauce from the first jar.
11. Top with 1 c. of the mozzarella.
12.  Layer 3 more sheets of lasagna noodles.
13.  Spread the remaining cheese/beef mixture on those sheets.
14. Add half of the sauce from the second jar.
15. Place 3 more lasagna noodles on top of the sauce.
16. Use the rest of the sauce to cover the noodles.
17.  Top with the last cup of mozzarella.
18.  Cover with foil and bake for 50-60 minutes.  (I only need 50.)
19.  Uncover and cook for about 5 more minutes.
20.  Let stand 15 minutes before cutting.  (If you can.  I can't ever do that....)

I almost always serve mine with garlic bread.  It's carb heaven.  :)

And the lasagna looks like that because I can't wait 15 minutes before cutting....
Variations I have tried:
-Add spinach to the cheese mixture.
-Layer pepperoni on top of each cheese/beef mixture.
-(And I have done both of the above at the same time.)
-Use 1 lb Italian sausage instead of ground beef.

post signature
 
Content Rebeckann's Random Thoughts | Design Poppiness Designs