Showing posts with label chocolate and peanut butter. Show all posts

Tuesday, August 5, 2014

Chocolate Peanut Butter Protein Bars

At the beginning of July, I shared that Scott and I broke down and joined a gym.  It was just something that we knew we needed to do to take care of ourselves.  We've tried at home workouts, but the problem is that for us, working out at home is just not motivating enough...or totally inconveniences someone when someone else gets up at 4 AM to hop around to Insanity while you're trying to sleep until 6.....

Anyway.

Having to pay for something is a pretty big motivator to get out of the house and go.  Scott told me the other day that he's tired of protein shakes, and he asked me to find some recipes for protein bars or muffins or some kind of snack to have after a work out.

And behold, the Chocolate Peanut Butter Protein Bars were born.  The original recipe made peanut butter protein bars using vanilla protein powder.  Our local grocery store doesn't even sell protein powder, so while I was there picking up ingredients the other day, I figured that you can't go wrong with chocolate and peanut butter.  So I just decided to use the chocolate protein powder we had on hand.


Ingredients

  • 1/2 c. nonfat milk
  • 1 c. Jif Extra Crunchy Peanut Butter
  • 3 T honey
  • 1 1/2 c. 100% Whey Protein Powder- Chocolate
  • 2 c. regular oats (not quick cook)
1. Line a 9 x 13 baking pan with wax paper and spray with non-stick cooking spray.


2. Add milk, peanut butter, and honey to a sauce pan.


3. Over medium heat, stir milk, peanut butter, and honey until well combined.


4. Remove from heat and stir in chocolate protein powder.


5. Then stir in the oats.


6. Until it is all combined (and yes, this takes a little elbow grease!).


7. Transfer the mixture onto your wax paper-lined baking pan, and pat down.  (This is a super sticky and messy process, but it was pretty fun!)


8.  If you're a perfectionist like me, grab a spatula, spray it with a little cooking spray, and use it to form this into a more rectangular shape with a smooth top.  This will also help to make the bars more uniform in thickness.

9.  Allow the mixture to cool completely, and then cut into bars.

This was SOOOO easy!  It was incredibly similar to making no-bake cookies, but there was no butter, and no added sugar.  Even better--they TASTE like a no-bake cookie!  In my book, a healthy treat that tastes like something unhealthy is an absolute WIN in my book.

Because I am watching my calorie in-take, and Scott wanted a snack that was pretty close to 20g of protein, I did some math (ugh), and figured out the calories and protein for cutting these into 8 bars or 12.  I decided to cut my rectangle into thirds, and then each of those into fourths to make 12 bars, but if you want a slightly longer bar, just cut it in half and then into fourths.

For 8 Bars: 398 calories, 27.5g protein
For 12 Bars: 266 calories, 18.3g protein

While I was browsing for protein snacks, I also found some meals that were packed with protein.  Stay tuned for another recipe soon! :)


Tuesday, December 17, 2013

Peanut Butter Blossoms

One of my favorite things about Christmas is making Christmas cookies!!  Of course, these cookies can be made any time of the year, but they're just more special when you're making them on a snowy day with Christmas just around the corner!  :)

For those of you who are new around here, please remember, that I'm not creative enough to make recipes of my own!  When I post a recipe, it's just something I've tried in my kitchen.  I note changes I made or things that did/didn't work for me.  I find that it's always nice to hear from someone else any problems that were encountered or adjustments to make things easier.  I also am sure to make sure you know where I found the original recipe.

I found this recipe on a coupon for Crisco products last year.  I didn't need the coupon, but I did need want the recipe! 

Peanut Butter Blossoms
Ingredients


Baking soda not pictured because I am a dummy.  :)

  • 1/2 c. Crisco Butter Flavor All-Vegetable Shortening
  • 1/2 c. Jif Creamy Peanut Butter*
  • 1/2 c. firmly packed brown sugar
  • 1/2 c. granulated sugar
  • 1 large egg
  • 2 T milk
  • 1 tsp. vanilla extract
  • 1 3/4 cups Pillsbury BEST All Purpose Flour**
  • 1 tsp. baking soda
  • 1/2 tsp. salt
  • sugar
  • Hershey's Kisses
*I ALWAYS buy and use Jif Peanut Butter, but I never buy or use creamy.  I LOVE, LOVE, LOVE extra crunchy.  Which, by the way, is the only other option.  There's just creamy and extra crunchy.  I don't know why, but I'm ok with that.
**I use whatever store brand generic all-purpose flour I have in my cabinet.  :)

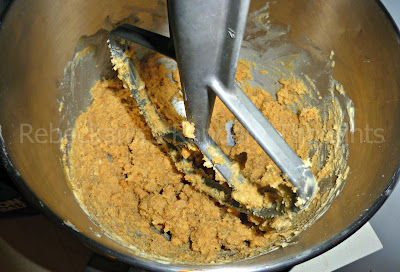
 1.  Preheat oven to 350 degrees.  (The original recipe calls for 375 degrees.  I bake almost everything at 350.) Cream together shortening, peanut butter, brown sugar, and 1/2 c. of sugar.

Before
After
 2. Add egg, milk, and vanilla.  Beat well.
 
 
3. Stir together flour, baking soda, and salt.
 
Before
After
4. Add to creamed mixture.  (Tossing it all over your mixer and counter while adding it to the bowl is totally optional.) 
 
Don't know if you can tell or not, but this is an action shot! :) haha
5.  Beat on low speed until stiff dough forms.
 
 
6.Shape into 1-inch balls.  (I totally don't know what size that would actually be.  Just shape it into a dough ball, and go with it!)
 
 7. Roll in sugar.
 
8. Place 2 inches apart on ungreased cookie sheet.
 
 
 9. Bake at 350 degrees for 12 minutes or until golden brown.  (If you go with 375 degrees, you may want to adjust the time to 10 minutes.)
 
I apologize for my lousy baking sheets.  This was my good one.  I only used it for baking cookies.  Then someone's husband made regular food on it....and well, THIS happened.  :-p
10.  Immediately, top each cookie with a Hershey's Kiss.  Be sure to press down firmly to settle the Kiss into the cookie.
 
 
11. Remove from sheets to cool.
 
The recipe says it yields 4 dozen (48) cookies.  I got just over 2 dozen (28 cookies).  I'm guessing my "1 inch" dough balls were too big, but honestly, it's not like they taste any different.  So if you want to get more cookies out of this recipe, just make the dough balls smaller.
 
Enjoy!

Friday, June 28, 2013

Microwave Brownie

One of the best things about my Bean Pot is that you can make things in the microwave that you probably wouldn't think of.  Cake, brownies, corn on the cob, even a whole chicken! 

I finally have a microwave big enough for my Bean Pot.  The one we had before was so small that it wouldn't even fit when I turned the lid upside down! 

My friend, Anna, held a Pinterest Themed Celebrating Home party for me, and she decided to make a chocolate peanut butter chip brownie in her Bean Pot in the microwave.  (We have the same Bean Pot.)  It was SO yummy!  I decided to make it for my Celebrating Home team meeting a couple of weeks ago.

Chocolate Peanut Butter Chip Brownie

Ingredients
  • 1 box brownie mix (plus ingredients listed on the back of the box- mine were 2 eggs & oil)
  • peanut butter chips
1. Mix brownie mix, ingredients from the box, and 2/3 of the bag of peanut butter chips directly in your Bean Pot.
 
2. Place the lid on the Bean Pot and put it in the microwave and bake for 8-12 minutes.  (I'm giving you kind of a large time window here.  Anna cooked hers for 12 minutes and stated that the edges were a little hard/overdone.  I tried 10 minutes.  The entire thing was a little crunchy on the outside, but while it was warm, it was super easy to scoop and eat, and it tasted delicious.  When it cooled, it was rock hard.  I actually needed to pour some milk in it and reheat it a bit.  Next time I make this, I'm going to try 8 minutes.)

Celebrating Home Bean Pot in Simply Summer $39.
 
3.  Remove the Bean Pot from the microwave, and sprinkle with the remaining peanut butter chips.


Do you like my Bean Pot???  This is a spring/summer exclusive pattern called "Simply Summer."  Celebrating Home has a lot of other patterns to choose from!  You can snag your own by using the link below to be taken directly to the Celebrating Home website so that you can participate in my Blog Party!  You have a chance to win FREE MERCHANDISE!!  Visit the Blog Party link for all of the details.

http://www.celebratinghome.com/parties/blogparty519744/PWPHome.aspx

The party runs until July 8th!


post signature

Wednesday, June 19, 2013

Influenster Spring VoxBox Part 4 (TastyKake Kandy Bar Kakes)

I am almost done reviewing the awesome products I received in the Spring Fever VoxBox from Influenster!  I'm so excited to share these last two products with you, so I will be reviewing one today and one more tomorrow. 

Here's my box again:


Just to review, here are the products I received (with links to the ones I've already reviewed).
OSIS Rough Rubber
TastyKake Kandy Bar Kakes- Peanut Butter

Today, I am reviewing TastyKake Kandy Bar Kakes- Peanut Butter.

Yes, this is my desk at work.  I took it for dessert with lunch.  :)

I'm pretty sure I've mentioned a million times once or twice that I love all things Chocolate and Peanut Butter.  So you can imagined that I was thrilled to have gotten this particular TastyKake Kandy Bar Kake with my VoxBox.  There were three different ones you could have received.  It was fate, I think.

The packaging is pretty clear about what you're getting, and I really loved that they specifically used Reese's.  I suppose that IS the point of the candy bar cake, though! ;)  The "Kake" itself is also appealing.


I really like the chocolate base with the peanut butter swirls.  Unfortunately, though, that is where my likes end.  The most important part of a food item is its taste.  I'm not sure if it's because my expectations were so high or what it was.  I like TastyKake as a brand.  As far as snacking baked goods, they're at the top.  I particularly love their Butterscotch Krimpets.  Mmmmm.  But this was so disappointing.

The cake was dry.  There wasn't NEARLY enough peanut butter.  The picture on the package shows a thick layer of peanut butter in the center.  This did not have that.  The swirls on the outside didn't even taste "peanut buttery."  It just kind of had a strange taste overall.  The other drawback is that just this one bar had 240 calories!!  I'll admit, I don't obsess over calories.  If I like something, and I really want it, I'll eat some.  BUT to put this in perspective, I eat PopTarts for breakfast almost every day, and two of those are 400 calories.

Maybe this was just a bad sample.  Maybe the other Kandy Bar Kakes are better.  Maybe it was just me.  But based on my taste test, I'll stick to my Butterscotch Krimpets.


I received these products complimentary from Influenster for testing purposes.
These are my opinions only. I am not compensated by Influenster or TastyKake for my thoughts on this product.


post signature

Saturday, April 20, 2013

Chocolate Peanut Butter Shake

I'm pretty sure I've mentioned before that I have a deep love for the delightful combination of chocolate and peanut butter.

I've been doing well with cutting back on unhealthy foods and eating smaller portions.  One of the things I have enjoyed is having a shake for breakfast.  We were given a couple of variations with our Insanity diet plan, but I wanted something new.  Therefore, I once again turned to Google.  I don't remember the exact search terms, but basically, I found a couple of ideas and put them together for my own shake.

And it's really so easy, you may have already figured it out for yourself.

But here it is anyway.  :)

Rebeckann's Chocolate Peanut Butter Protein Shake
Ingredients
  • 1 c. skim (low fat) milk
  • 1 scoop chocolate whey protein powder
  • 1 spoonful of peanut butter
  • 1/2 a banana
  • ice (I use 4-5 cubes)
Toss all of the ingredients into a blender.  I set mine to the smoothie setting and let it go for a couple of minutes until I'm convinced that there are no banana chunks and the peanut pieces from my extra crunchy peanut butter are gone.

I also allow my shakes to sit for a minute to let any foam settle.


I was surprised at how long this shake sustained me.  The other shakes I tried did well, too, but this one lasted a little longer.  I think it's the addition of the peanut butter. 

This is so yummy, and I had it a couple of times this week.  Just don't pull a card from my book and forget to put the dispensing spout on your blender.  I forgot this yesterday, and....well...when I poured the milk in, I ended up with milk all over the counter and floor.  :-p  lol

ALSO, Jane at Pursuit of Poppiness is having a great giveaway!   You could win a $25 Erin Condren Gift Card, a custom blog signature, and large ad space on her blog!  It's a great giveaway that you totally want to enter!

post signature
 
Content Rebeckann's Random Thoughts | Design Poppiness Designs